
A well-built concrete block retaining wall can transform your landscape while solving erosion problems and creating usable outdoor space. At JH Landscapes, we’ve seen how the right retaining wall can make all the difference in Charlotte properties.
Whether you’re dealing with a sloped yard or simply want to add visual interest to your landscape, a properly constructed concrete block retaining wall offers durability and functionality for decades. This guide walks you through the essential steps and considerations for building a retaining wall that stands the test of time, from proper planning to final touches.
Planning Your Concrete Block Retaining Wall
Proper planning is the foundation of any successful retaining wall project. Before purchasing materials or breaking ground, you’ll need to make several key decisions that will impact your wall’s longevity.
First, check local building codes and permit requirements. Many municipalities require permits for walls over a certain height (typically 3-4 feet). Skipping this step could result in fines or forced removal of your completed wall.
Next, determine the precise location and dimensions of your wall. Mark the area with stakes and string to visualize the finished project. Consider how water will flow around the wall during heavy rain. Proper drainage is critical to preventing failure.
The height of your wall will dictate construction requirements. Walls under 4 feet can typically be DIY projects, while taller structures may need engineering expertise from professional retaining wall installation services in Charlotte NC.
Finally, calculate materials needed. Factor in blocks, gravel for drainage, landscape fabric, and capping stones. It’s always wise to order 10% extra materials to account for breakage or miscalculations.
Essential Materials and Tools
Gathering the right materials and tools before starting will ensure your project progresses smoothly. For a standard concrete block retaining wall, you’ll need:
Materials:
- Concrete blocks (retaining wall blocks, not standard cinder blocks)
- Crushed stone or gravel (3/4″)
- Landscape fabric
- Drainage pipe (4″ perforated)
- Masonry adhesive
- Cap blocks
- Backfill material (clean gravel)
Tools:
- Shovel and spade
- Wheelbarrow
- Level (2′ and 4′)
- Tape measure
- String line
- Line level
- Tamper (manual or power)
- Rubber mallet
- Mason’s hammer
- Safety gear (gloves, eye protection)
- Marking paint
- Plate compactor (can be rented)
Quality materials make a significant difference in your wall’s lifespan. The experts at JH Landscapes always recommend investing in proper drainage materials and high-quality blocks designed specifically for retaining walls, as these will prevent premature failure and costly repairs.
Excavation and Foundation Preparation
A proper foundation is crucial for a long-lasting retaining wall. Start by excavating a trench that’s approximately 24 inches wide and deep enough to accommodate your base material plus one full block below grade (typically 8-12 inches deep).
The trench should have a slight slope away from the retained soil. Aim for about a 1-inch drop for every 4 feet of wall length. This helps with drainage and prevents water pressure from building up behind the wall.
After excavation, line the bottom of the trench with landscape fabric, extending it up the back side where soil will be retained. This prevents soil from mixing with your drainage materials.
Next, add a 6-inch layer of crushed stone or gravel to the trench and compact it thoroughly using a plate compactor. A solid base prevents settling that could cause your wall to lean or crack over time. Check for level as you go, making adjustments as needed.
If your wall will be over 3 feet tall, now is the time to install a drainage pipe. Place the perforated pipe along the back of the trench, sloping to direct water away from the wall. Cover with gravel and landscape fabric to prevent clogging.
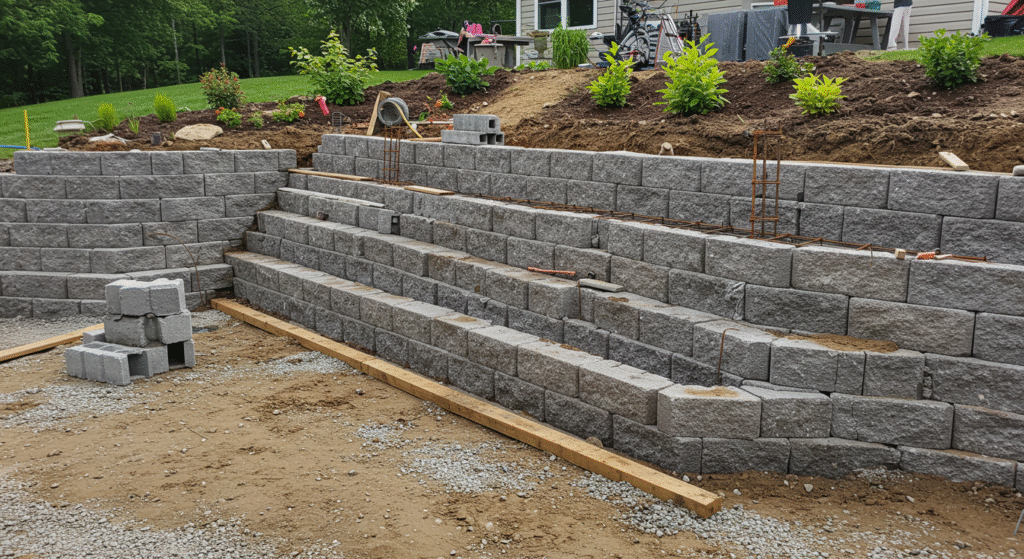
Laying the First Course
The first course of blocks is the most critical, as it establishes the foundation for everything above. Take your time with this step to ensure precision.
Start at the lowest point of your planned wall. Place your first block, checking for level both front-to-back and side-to-side. Use your rubber mallet to make minor adjustments. Continue placing blocks side by side along your trench, checking level frequently.
Some retaining wall blocks have locking mechanisms or need to be offset in specific patterns. Follow manufacturer guidelines for your particular blocks. Many systems use a pin-and-hole design or have a lip at the back that automatically creates the proper setback.
As you work, backfill behind the blocks with gravel. This creates a drainage zone that prevents water pressure from building up behind your wall. Compact this material thoroughly before moving to the next course.
For homeowners in the Ballantyne area, our expert landscaping services in Ballantyne NC can provide guidance on specific soil conditions that might affect your retaining wall construction.
Building Subsequent Courses
Once your first course is level and properly aligned, you can begin adding subsequent courses. Most retaining wall systems are designed with a slight setback (typically ½ to 1 inch per course), creating a wall that leans slightly into the hillside for better stability.
Place the second course of blocks in a staggered pattern, so the joints don’t align with those in the first course. This creates a stronger wall through interlocking. Follow manufacturer guidelines for your specific block system regarding how to create proper setbacks.
After laying each course:
- Add drainage gravel behind the blocks to a width of at least 12 inches
- Compact the gravel thoroughly
- Check for level and proper alignment
- Ensure the correct setback is maintained
Continue this process for each course until you reach your desired height. Remember that walls over 4 feet tall typically require special engineering considerations and may need reinforcement with geogrid, a synthetic material that extends into the soil behind the wall to create additional stability.
Installing Drainage Features
Proper drainage is perhaps the most critical factor in retaining wall longevity. Water accumulation behind a wall creates tremendous pressure that can cause failure even in well-built structures.
For walls over 3 feet tall, install a perforated drainage pipe at the base of the wall, behind the first course. The pipe should be surrounded by gravel and wrapped in landscape fabric to prevent clogging. Ensure the pipe has an outlet to direct water away from the wall, either daylight the pipe at the end of the wall or connect to an existing drainage system.
Create a continuous drainage zone behind the entire wall using clean gravel (3/4″ is ideal). This drainage zone should be at least 12 inches wide and extend from the base to near the top of the wall.
If your property has significant groundwater issues, consider installing additional drainage solutions like French drains uphill from your wall. Our experts at JH Landscapes can assess your specific situation and recommend appropriate drainage solutions.
Finishing Your Retaining Wall
The final touches make a significant difference in both the appearance and function of your retaining wall.
Cap blocks (also called coping stones) provide a finished look while protecting the top of your wall from water infiltration. Secure these with masonry adhesive designed specifically for outdoor use. Apply a generous bead of adhesive to the top course of blocks, then press the cap stones firmly into place.
Backfill the final 12 inches behind your wall with topsoil suitable for planting. Consider adding plants with shallow root systems that won’t compromise your wall’s structure but will help control erosion and add visual appeal.
Extend downspouts away from your retaining wall to prevent concentrated water flow from damaging your new structure. Ideally, downspouts should discharge at least 3 feet away from the base of the wall.
Finally, consider landscape lighting to highlight your new wall after dark. Well-placed lighting not only showcases your investment but also improves safety by illuminating changes in elevation.
Maintenance Tips for Long-Term Durability
A properly built concrete block retaining wall requires minimal maintenance, but a few simple practices will extend its lifespan significantly:
- Inspect your wall seasonally for signs of movement or damage. Look for bulges, leaning sections, or cracks in blocks or caps. Early intervention can prevent more serious issues.
- Clean your wall annually to remove dirt, debris, and organic growth. For most concrete blocks, a pressure washer on a low setting works well. Avoid high pressure, which can damage the surface of blocks.
- Check drainage systems yearly, especially before rainy seasons. Clear any debris from drainage pipe outlets and ensure water continues to flow freely away from the wall.
- Repair any damaged blocks promptly. While concrete block walls are designed to last decades, individual blocks can crack due to settling or impact. Replace damaged blocks according to manufacturer guidelines.
- Protect your wall from impact damage by keeping lawn equipment at a safe distance. Consider installing bollards or large decorative rocks at the base of walls in areas where vehicles might back into them.
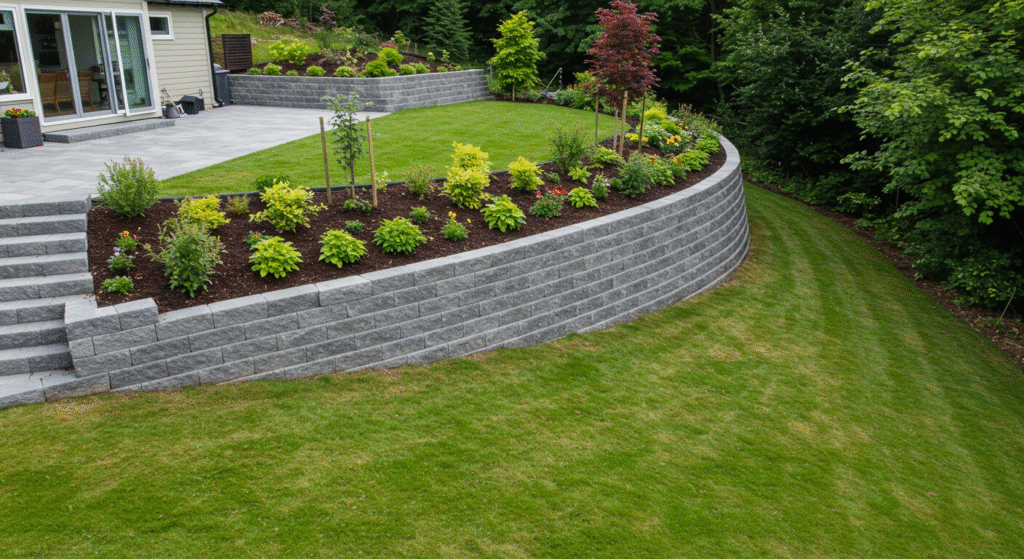
Case Study: A Charlotte Success Story
Last year, we completed a retaining wall project for the Johnson family in Charlotte’s Myers Park neighborhood. Their sloped backyard was virtually unusable, and erosion was becoming a serious concern during heavy rains.
We designed a terraced solution using concrete blocks that created two level areas: an upper patio for entertaining and a lower play area for their children. The 4-foot walls included proper drainage systems, integrated lighting, and built-in planter areas.
The results were transformative. Not only did the retaining walls solve their erosion issues, but they also expanded their usable outdoor space by nearly 800 square feet. The family now enjoys outdoor meals on their new patio while watching their children play safely in the yard below.
This project demonstrates how well-constructed retaining walls can be both functional and beautiful, adding value to your property while solving practical problems.
Frequently Asked Questions
How long will a properly built concrete block retaining wall last?
A properly constructed concrete block retaining wall can last 40-50 years or more. The key factors affecting longevity include proper drainage installation, quality of materials, correct installation techniques, and appropriate engineering for the site conditions.
Walls under 4 feet that are built according to manufacturer specifications and with proper drainage typically perform exceptionally well for decades with minimal maintenance.
How much does it cost to build a concrete block retaining wall?
The cost varies significantly based on height, length, site accessibility, and material choices. For DIY projects, expect to pay $15-25 per square face foot for materials. Professional installation typically ranges from $30-50 per square face foot, with higher costs for taller walls requiring engineering.
A typical 4-foot-tall by 20-foot-long wall might cost $2,400-5,000 professionally installed. Complex projects with difficult access or special drainage requirements will be at the higher end of this range.
Do I need a permit to build a retaining wall?
Permit requirements vary by municipality, but most areas require permits for walls over 3-4 feet in height. Some locations also require permits if the wall is supporting a structure or near property lines regardless of height. Always check with your local building department before starting construction. Even for walls that don’t require permits, following proper construction techniques is essential for safety and longevity.
How do I know if my soil requires special consideration?
Clay soils, which are common in the Charlotte area, typically require more extensive drainage systems due to their poor permeability. Sandy soils may need additional compaction to prevent settling. If your property has springs or underground water sources, specialized drainage solutions are necessary.
Professional soil testing is recommended for walls over 3 feet tall. Signs that your soil might need special attention include standing water after rain, existing erosion issues, or previous wall failures on your property.
Can I build a concrete block retaining wall myself?
Walls under 3-4 feet tall are typically suitable for experienced DIYers with proper preparation and research. However, even “simple” walls require careful planning, proper drainage installation, and attention to detail.
Walls over 4 feet tall should generally be designed by an engineer and built by professionals due to the significant structural loads and safety implications.The most common DIY mistakes include inadequate drainage, improper base preparation, and failing to account for the setback needed for stability.
Ensuring a Durable and Lasting Concrete Block Retaining Wall
Building a concrete block retaining wall that truly lasts requires careful planning, quality materials, and proper construction techniques. While the process might seem straightforward, the details, particularly regarding drainage and foundation preparation, make all the difference between a wall that fails prematurely and one that serves your landscape for decades.
If you’re tackling a DIY project, invest time in research and preparation. For larger walls or complex situations, professional installation ensures safety and longevity. When properly built, your concrete block retaining wall will not only solve practical landscape challenges but also enhance your property’s beauty and value for years to come.
About JH Landscapes
At JH Landscapes, we turn ordinary yards into beautiful, functional outdoor spaces that reflect your lifestyle. With years of hands-on experience and a team that truly cares, we bring a personal touch to every residential and commercial project we take on.
From lush backyard retreats to clean, professional landscapes for businesses, our services are designed with your vision in mind. Let’s work together to create an outdoor space that’s both inviting and built to last.
Contact JH Landscapes today at (704) 999-0976 to start planning your next landscaping project. Book a consultation to see how we’ve helped property owners across the Charlotte metro area bring their outdoor dreams to life.